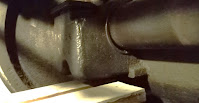
It's been four years since we last reported on the effort to produce new motor bearings for the 309. And in case you don't remember that far back:
The problem is as follows: on the #1 truck, the axles were turned down by the railroad in the areas where the motor bearings ride. As a result, the bearings are very loose -- as you can see here:
There's about a 1/2" gap between the axle and the lower bearing surface. This allows the motor to jump up and down depending on which direction you're traveling and whether the motor is powering the car. So new, thicker bearings are needed. We have plenty of badly worn ones in stock, but nothing that would help this situation. We had a rough casting produced by a foundry in Chicago, and the two halves were soldered together in preparation for machining, back in 2019, but then the project ground to a halt. Until now.
I decided to make this a priority, and repossessed the casting. Within a week I had located a machine shop that could do the work, and in another week the machining was finished to my satisfaction. I should have taken a picture of the rough casting, but didn't. Anyway, the finished product was beautiful. Here it is on my bench at home. Of course, the two halves are still soldered together, but it's almost impossible to see the joint.
The oval gap in the bottom piece is for lubrication of the axle by the cotton waste bundles in the motor cap.
On Thursday morning I brought it to the Museum. The first thing that still needed to be done was to drill the holes for the alignment pins that keep the bearing from rotating relative to the motor, and I wanted to double-check the alignment. You need a big drill press for this job.
Next, let's squeeze ourselves under the car to see if we can remove the old bearings. The first thing to do is to unbolt the motor cap and slide it out of the way, on a platform made for the purpose. The motor itself is jacked up slightly with an old auto jack so that it isn't resting on the bearings any more. And you can now see the old bearings still on the axle:
First, I remove the bottom half and set it on the shelf. The upper half has now slid down around the axle and is underneath it. That's excellent, since I was afraid it might be hard to remove.
The upper half is slippery and there's nothing to hold onto, but eventually it can be lifted off the axle and set on the shelf. Now we see the bare axle behind it. It has no visible flaws.
For safety, I insert some wood so the motor can't drop onto the axle if the jack gives way somehow.
Now it's time to unsolder the new casting. First, I use a spare GE 66 motor cap to check that the holes were indeed drilled in the right spot. It fits nice and tight.
Then the casting was placed in the big oven, the temperature was set for 550F, and we wait for the temperature to slowly climb to the setpoint. After a couple of hours, the casting separates into two halves, and we wait another couple of hours for the parts to cool down.
Then they're taken home for cleaning up the solder joints and the newly-drilled holes.
Meanwhile, lots of things were going on, and among them was dumping more gravel in Barn 4 so the new floors can be poured. Most of the weekday guys were helping with this arduous task. I didn't want to be too far from the big oven while it was heating up, but after it was turned off and started to cool down, it was safe to venture out and help a little with shoveling. But the other guys did most of the work.
The tie crane (above) pushed a dump cart back and forth: outside to have the bins loaded by a big front loader, then inside the barn so it could be dumped by hand and leveled. And as you can see, the route leads right over the pit.
It's hard work, but that's the price we pay for progress.


No comments:
Post a Comment
Please identify yourself with a name of some sort in your comment. Completely anonymous comments will be deleted. Thanks!