Saturday, January 28, 2012

One Down

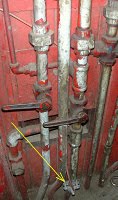
Electrical repairs on car 36 are still the main priority right now, so I brought out the first MU socket kit to install. Because this one has a very short run of armored cable, I needed some brief help from Dan Fenlaciki to get the parts to line up, but here it is attached to the car.

And here's what the #2 junction box looks like after all the connections are made. Compare this picture to the previous one. Installation wasn't at all difficult; the mock-up junction box at home made it easy to have all the wires just about the right length.

When Frank arrived, he helped me sequence the system and check all the connections. Here we have a light box which can be connected across various combinations of terminals in the jumper to verify that everything was wired properly and insulated. So that's one down, and three to go!

He then got pulled off to help with a switch move, even in the dead of winter. The 1797 needed to be wyed so Tim can continue, and here it is on its way back to the pit. You can barely see Tim giving signals as the L4 pushes it in.

But I had plenty to do in the meantime, various details to take care of. The roof fuse box is in pretty good shape, and Frank took it to the shop to clean up and repaint. I cut out the remaining pieces of armored cable to take home, so the three remaining kits can be made. We're making good progress.

Can you keep a secret? No, I didn't think so either. Well, there are a couple of projects in the works I can't tell you about yet, but maybe later. So don't go away!

Thursday, January 26, 2012

36 Update

We now have the correct size armored cable and fittings to install the wiring to the control jumper receptacles, so I spent a couple of hours fitting parts and cutting pieces to shape. It's not all done, but there's enough for me to take home and work on. And I did some more paint stripping, and helped Rod clean up the shop a little. Sorry, no pictures, but maybe tomorrow I'll have some of the new material assembled here at home.


Update: Here we have the first box attached to the armored cable, with the wires trimmed and connected to the toy connector box. All connector lugs are soldered, and all connections tested. It's ready to install.

Monday, January 23, 2012

Wheaton to Highwood

I hadn't been out to the museum in a couple of months due to an increased work schedule and other commitments, but I was able to make it out on Sunday and help out my father a bit on the 36. The first task was to ring out the control circuits from the controllers to the junction boxes under the platforms. This was done successfully; all wiring into the controllers is intact and in good shape. We also answered a question we'd had about the 600v power supply to the controller at the #2 end. Above right, my father inspects the junction box under the #1 end of the car.

After that I sanded down a couple more windows for the 36 and then headed over to North Shore 757, where a crew of people including project manager Gwyn Stupar, husband Joe, Greg Kepka and Joel Ahrendt were hard at work removing the heater covers from the smoker. This car had the original flooring in the smoker replaced with cheesy linoleum while at a different museum and the last of this linoleum was ripped out Sunday in preparation for replacement with rubberized flooring matched to the original material in the car's main compartment (this material is already on hand). At left, Joe and Gwyn work on removing the last seat frame prior to taking out the heater covers. I spent a little while helping and, with everyone pitching in, by the end of the day the smoker was completely empty.

And at right, here's something interesting: a plastic brake shoe! This is an example of rapid prototyping and was created using a machine that effectively functions as a 3D printer. It is a prototype for a brake shoe for CTA 3142. Just don't try to use this one in regular service.

Saturday, January 21, 2012

More Electrical Work


This seemed like a good day to work at home. I rewired the second jumper receptacle, using the same process as before. Then I built a toy junction box and cut the other end of the connections to the right length to attach them to the terminals. I also rechecked the connections electrically, since we don't have the luxury of color-coded wire.


And then I completed development of the amazing new Hicksco DB-15 Contactor Testing Station (patent pending) as seen here. It should be possible to test the operation of the contactor coils on 120V AC. The coil is activated by means of an ordinary push button wall switch, and the bulb will light up when the contactor tips close. Unfortunately, this contactor has a coil which I knew to be bad, so the tester works better than the contactor. But I'll take it out to the Museum and try it there. Most of the other contactors are good, I believe.

In any case, would anybody have some leads on an electrical shop that might be willing to rewind a coil or two for us?

Friday, January 20, 2012

Making Connections

I went out to the Museum yesterday but didn't take any pictures. Mostly I was checking some dimensions, and looked at the control wiring some more. And I collected various parts to take home, so I can work on rewiring the control jumper receptacles in comfort. I may pass on going out again tomorrow, as the snow is still falling even as we speak.

This is what the receptacle casting looks like, with the spring-loaded door propped open. The inner diameter is about 5". This is a standard GE part. The number of pins varies for different control systems.


The pins are mounted in a thick Bakelite frame, as seen here.


The pins are screwed onto solder terminals, which are inserted from the back. The terminals have a hex shape, and fit snugly into the base, so disassembling it is actually pretty easy. Here are the various parts. For unknown reasons, at Cleveland two of these receptacles were rewired and connected together with about 30' of 16 gauge wire, which is too small for regular use. So it needs to be replaced.

So let's drill a few holes in a block of scrap wood, unsolder the old wires, and solder our nice new 12 gauge 2000V wire into them.

After about an hour of work, all the soldering has been done, and here's a test assembly of the completed receptacle.

Next I need the 1" inside diameter armored cable and the appropriate connectors, which should be arriving soon, thanks to Rod Turner. I will also build a replica connector board and attach the lugs at the other end of the wires. And in theory, this will minimize the amount of work that needs to be done under the car. It's quite preferable to do as much as possible in my nice warm workroom while listening to, for instance, Richard Strauss!

Monday, January 16, 2012

Back to Work

First of all, we'd like to thank everyone who helped out with the World's Greatest Hobby show last weekend. Ray Bellock and Sam Polonetzky worked all day Sunday, and I already mentioned the people who worked on Saturday. Ed Rosengren is in charge of the other train shows we have a presence at, and all the members who help him deserve credit too.

So first, I dropped off the various items we used for the display.

And I continued working on replacing the control jumper receptacles and their wiring on the 36. The receptacles are on hand, along with nearly all the parts, and I should be able to start soldering them up at home soon. Rod acquired some armored cable, but I had given him some misleading information, and we'll need a different size. After some more measurements, we're probably on the right track.

Let's look at the junction boxes under the floor. (These pictures are looking straight up.) Here we have the box at the #1 end. There are ten terminals, for the nine wires in the control jumpers and the power supply for the controller. From the left, the cable from the controller enters the box. On the right, the upper cable goes to the #2 end, and the lower cable goes to the control group. There should also be two cables going to the left to the two receptacles at this end, but all of that was removed at Cleveland. Evidently they thought the wiring was bad.


The #2 end is similar, except that there's no cable to the control group, and therefore the power supply line is a separate red wire, which goes across the top. The cable to the #1 end goes to the left, and the cable to the controller goes to the right. At this end the cables to the receptacles were just hacked off, so I decided I might as well remove the remains now. The bolts were frozen, so it took a while.


After the excess wire is removed it's much neater. You get a better idea of just how it's connected. The various wires are color-coded as specified by GE.

I also spent a couple of hours stripping paint, as usual.


For a break, let's look at the ventilators. All other preserved wooden cars have "Utility" ventilators, so the 36 is an oddball. The ventilators have some louvers, covered by hinged metal plates sort of like chutes, as perhaps you can see here. There must have been some sort of little hook or casting at the top so the doors could be opened easily, but they have all disappeared. They can be pried open with some difficulty.


When closed, they look like this:

At some point I'll have to work on these. For normal operation, they can just be left open.

Sunday, January 15, 2012

News from California

From a regular reader of ours in California, Tony Gura, comes a report on the restoration of Indiana Railroad car 202, which is being restored at the Western Railway Museum as Portland Traction 4001, its later identity. This car is identical to our IRR 205, which is being cosmetically restored. Tony writes:

I visited the Western Railway Museum on Saturday and thought you might be interested in some pictures of their Indiana Railroad car 202 which just started being restored as Portland Traction 4001. The car is in good structural shape and the restoration is expected to last 2-2.5 years and the only work performed thus far has been to replace the roof and strip the interior. This car is a sister to Indiana Railroad 205, which is being restored by IRM from its Portland colors back to Indiana. Once complete, they are planning to use this car as their main car in service since it is built of steel, rather than wood, so it would handle the winter weather better and allow the other wood cars some well deserved rest.

PS You have inspired me to volunteer to help restore this car. I may not know how to do any work but they have a need for unskilled labor.


(All photographs courtesy Anthony Gura)


Saturday, January 14, 2012

Report from Schaumburg

The train show at Schaumburg went very well today. Attendance seemed to be good, and we had a lot of enthusiastic visitors. We handed out calendars and brochures and talked up the Museum as fast as we could. Here we see the morning crew: myself, Jon Habegger, and Buzz Morrissette. In the afternoon, Buzz had to leave and was replaced by Nancy Ring. It's not easy to compete with all the toy trains, but a good time was had by all! Expecially by the kids of all ages who got to ring the streetcar gong. They were probably driving the neighbors nuts!

By the way, there were several friends from IRM who were there as members of various model railroad groups: Bob Opal, Bill Thiel, Mike Pechous, Lee Evans, and maybe others.

So here's my scientific analysis of the comments we got by talking to the visitors. A lot of people had little kids, so it's not surprising that the most popular subject was Thomas. A lot of the people we talked to had been to Thomas before, had a great time, and were planning to return. That's a very good sign! Apart from that, the most common question, particularly among the adults, was whether steam would be running. Of course, we don't have a definite answer, but we said they're working as hard as they can, it's not easy, we're hoping it will be ready for testing, etc. But it's important. People in our area will drive down to Monticello, they'll fly to Colorado, they'll go almost anywhere to see operating steam. All I can say is that we support our friends in the Steam Dept. all the way!

Hey, you there! You have nothing better to do this Sunday. Come to the Schaumburg Convention Center and see some fantastic display layouts, buy a starter set for your grandchildren, buy some track or rolling stock for yourself, and stop in and say hello at the IRM booth. You'll be glad you did!

Friday, January 13, 2012

Our Booth

I took the various items up to Schaumburg this morning and got them set up in our space, as seen here. There's a display board with a nice selection of pictures and the DVD player, which I borrowed from Ed Rosengren, boxes of calendars and brochures, and a demonstration controller, mounted on the base I made for it four years ago. (I'm still working on a mounting for the gong.) There's lots of other stuff being set up, including some fantastic display layouts, so be sure to stop in sometime over the weekend and say hello!

Thursday, January 12, 2012

Last Fling

A winter storm was widely predicted to be on the way, so everybody was outside yesterday, taking advantage of the unseasonably warm weather to finish some last minute tasks. I helped with a switch move, and noticed here that John Faulhaber and Gerry Dettloff were working on the M-37, the TM container car. They wanted to fasten down the end of the new rubber membrane roof more securely.

That gave me an opportunity to take a picture of the container inside the car, as best I could. It gives a good idea of how the container fits into the car, rolling on small wheels along the two sills, which you can just make out. Of course, the doors to the container itself are missing.


And on the pit lead, Frank Kehoe and Tim Peters were steam-cleaning the underbody of the 1797, in preparation for mechanical overhaul. This is a lot more exciting in action, I must say. All the encrusted crud that accumulates on these cars over the years makes quite a mess.

There was more paint removal on the 36; as usual, it's hard to photograph inside the barn. Rod got me a spool of wire of just the right type for replacing the wiring to the missing control receptacles and other parts of the system, and we'll be ordering the armored cable once I determine the exact measurements.


While we're at it, let's look at the inside. Along with the 319 and maybe some others, this car had some interior paint stripping done at Cleveland as a test, I suppose. But it's very difficult to get all the paint out of the grain. And because the interior was last repainted when the car was rebuilt in 1946, we have no choice but to keep the current interior paint scheme. But it's interesting to see how well the original inlay has held up over 110 years.

And then I spent some time collecting boxes of calendars and brochures, and a demonstration controller, to take to the train show this weekend. Frank Sirinek also hunted down a streetcar gong I can use. Clang clang! The next post I write will be coming to you from Schaumburg. Several other volunteers and I will be representing your Museum there, so stop by and say hello!

Sunday, January 8, 2012

Help Needed for Next Weekend

As posted earlier, IRM will have a booth at the World's Greatest Hobby show at the Schaumburg Convention Center next weekend. We need additional volunteers to man the booth and hand out calenders and brochures, and generally talk up the Museum. I need at least one more person for Saturday, and two for Sunday. Please email me at randallhicks at wideopenwest dot com if you can help. You'll get in free, of course, and if we have at least two people you can take turns visiting all the other fascinating displays! This is your patriotic duty calling -- please help!

Saturday, January 7, 2012

Take This Car to the Zoo

Here at IRM, we can't let too many days go by without a huge switch move. Today the west end of Barn 4 was shuffled, so among other things the 141 was brought out into the sun. It looks great! It's getting very close to operation; Frank says we just have to get the brakes working, and he'll be ready to test the motors! It's not legible, I'm afraid, but the car is signed for Brookfield Zoo. Let's go!

I got to help a little by pushing track carts out of the way. That's always fun. And I helped unload some lumber that Tim brought in from the feed mill in Huntley. These are huge planks of white pine, 3x12, about 25' long. It took six or more of us to unload them, I don't even remember who all helped. Tim, Bill, Mike, Victor, Nancy, and myself. Tim will be cutting them down slightly to make running boards for the 1797.

Part of the time I was burning paint off the 36 again. I failed to take any pictures of this activity. But you're not missing much.


I installed the motor circuit fingers on the reverser, cleaned the coils, and rechecked the operation. Just like downtown!

I cleaned up the inside of the reverser cover and painted it with Glyptol; it was then set out in the sun to dry. At some point I need to clean and repaint the outside too.

Me and my shadow.


With the cover installed, the reverser looks like this. This should have been done before the car left Cleveland, but better late than never.


And I also took the kingpin from the #2 end over to our friends in the steam shop to straighten out. It's about 3' long and 2" in diameter.


Here we see Matt Dowd and Ralph running the big press to bend the pin. I wish I had a video of this thing in operation, it's hilarious. The hydraulic pump chugs along, driven by two rods with valve-gear-like motion, and there's a huge counterweight. What a blast! Anyhow, they straightened it out as well as anybody could, but it still doesn't drop down all the way. So I just don't know.

We will be jacking up the car at some point, so this problem will be solved sooner or later. As a matter of general principle, we here at your Museum refuse to admit defeat!

Thursday, January 5, 2012

36 Report

As an update to yesterday's post, I started by investigating a minor problem with the reverser: intermittent operation. I polished up the contact surfaces on the reverser some more, and it seems to operate reliably now. Here's a picture of the assembled controller. I have not yet installed the fingers for the motor circuits, but they don't affect the operation of the controller. It needs some more cleaning on the coils and other surfaces, I know.

The next electrical problem is that we aren't getting 600V power to the controller at the #2 end. I haven't yet traced this out, but it should not be difficult to fix. I'm also plotting the acquisition of various other parts we'll need before installing the contactors. For instance, Rod will be ordering the rubber grommets we need for the support bolts. Since the entire frame of a DB-15 contactor is live, it's necessary to insulate it from the bolts.


Much of the rest of the day was involved in stripping paint from the #1 end of the car, since there's room to work. Here we see the work in progress.

And it was a nice day for a walk, so I checked on the 321 again.


Jim Followell stopped by. He's getting ready to finish painting the 451, and he asked me about the controller cover for the 319. It's still over in Barn 2, and he'll shoot it at the same time as the car. I went over there with him to make sure we had the right part.


The vestibule is stunning. The fresh paint in this flash picture is nearly blinding.

By the way, back on the 36, there's an earlier version of green paint under the retriever bracket. I don't know how long this paint was there; I would have said all pictures of the car at Olmsted Falls had the darker green.

High School Grads

Most of the CA&E cars had pretty much the same set of car cards when they left service, but today I noticed one in the 451 I hadn't seen before. It's hard to make out, but the label at the bottom gives an address for the Army recruiting station in Wheaton. So if you just graduated from Wheaton High, you could learn to be a surveyor, a radio announcer, a TV repairman, or a photographer. Now when I was in the Army, I learned a little about how to supervise a tank platoon, but that has had very little value in civilian life, I must say. Obviously I wasn't reading the right car cards.

Wednesday, January 4, 2012

Electrical Work

Good progress was made today on car 36. I reassembled the reverser, tested it electrically, and verified that it will indeed reverse. John Faulhaber helped briefly with this. So that's an important step forward. I also checked that all the lights work, and got the buzzer working. Then I removed the bogus wiring that grounded the light circuits through the air pipes. The lights work fine when the original system is used, where the ground connection is made through the frame of the controller. And I did some preparatory work for installing contactors. So that's all pretty encouraging.

There will be more news and current pictures when I get home tomorrow night.