Wednesday, January 27, 2021

It's a Stretch

Wednesday is not my usual day, but the snow yesterday made driving hazardous, and late is better than never, so....

First, we see Pete Galayda working on doors for the 160.


Later in the day, the nice fresh paint is drying:


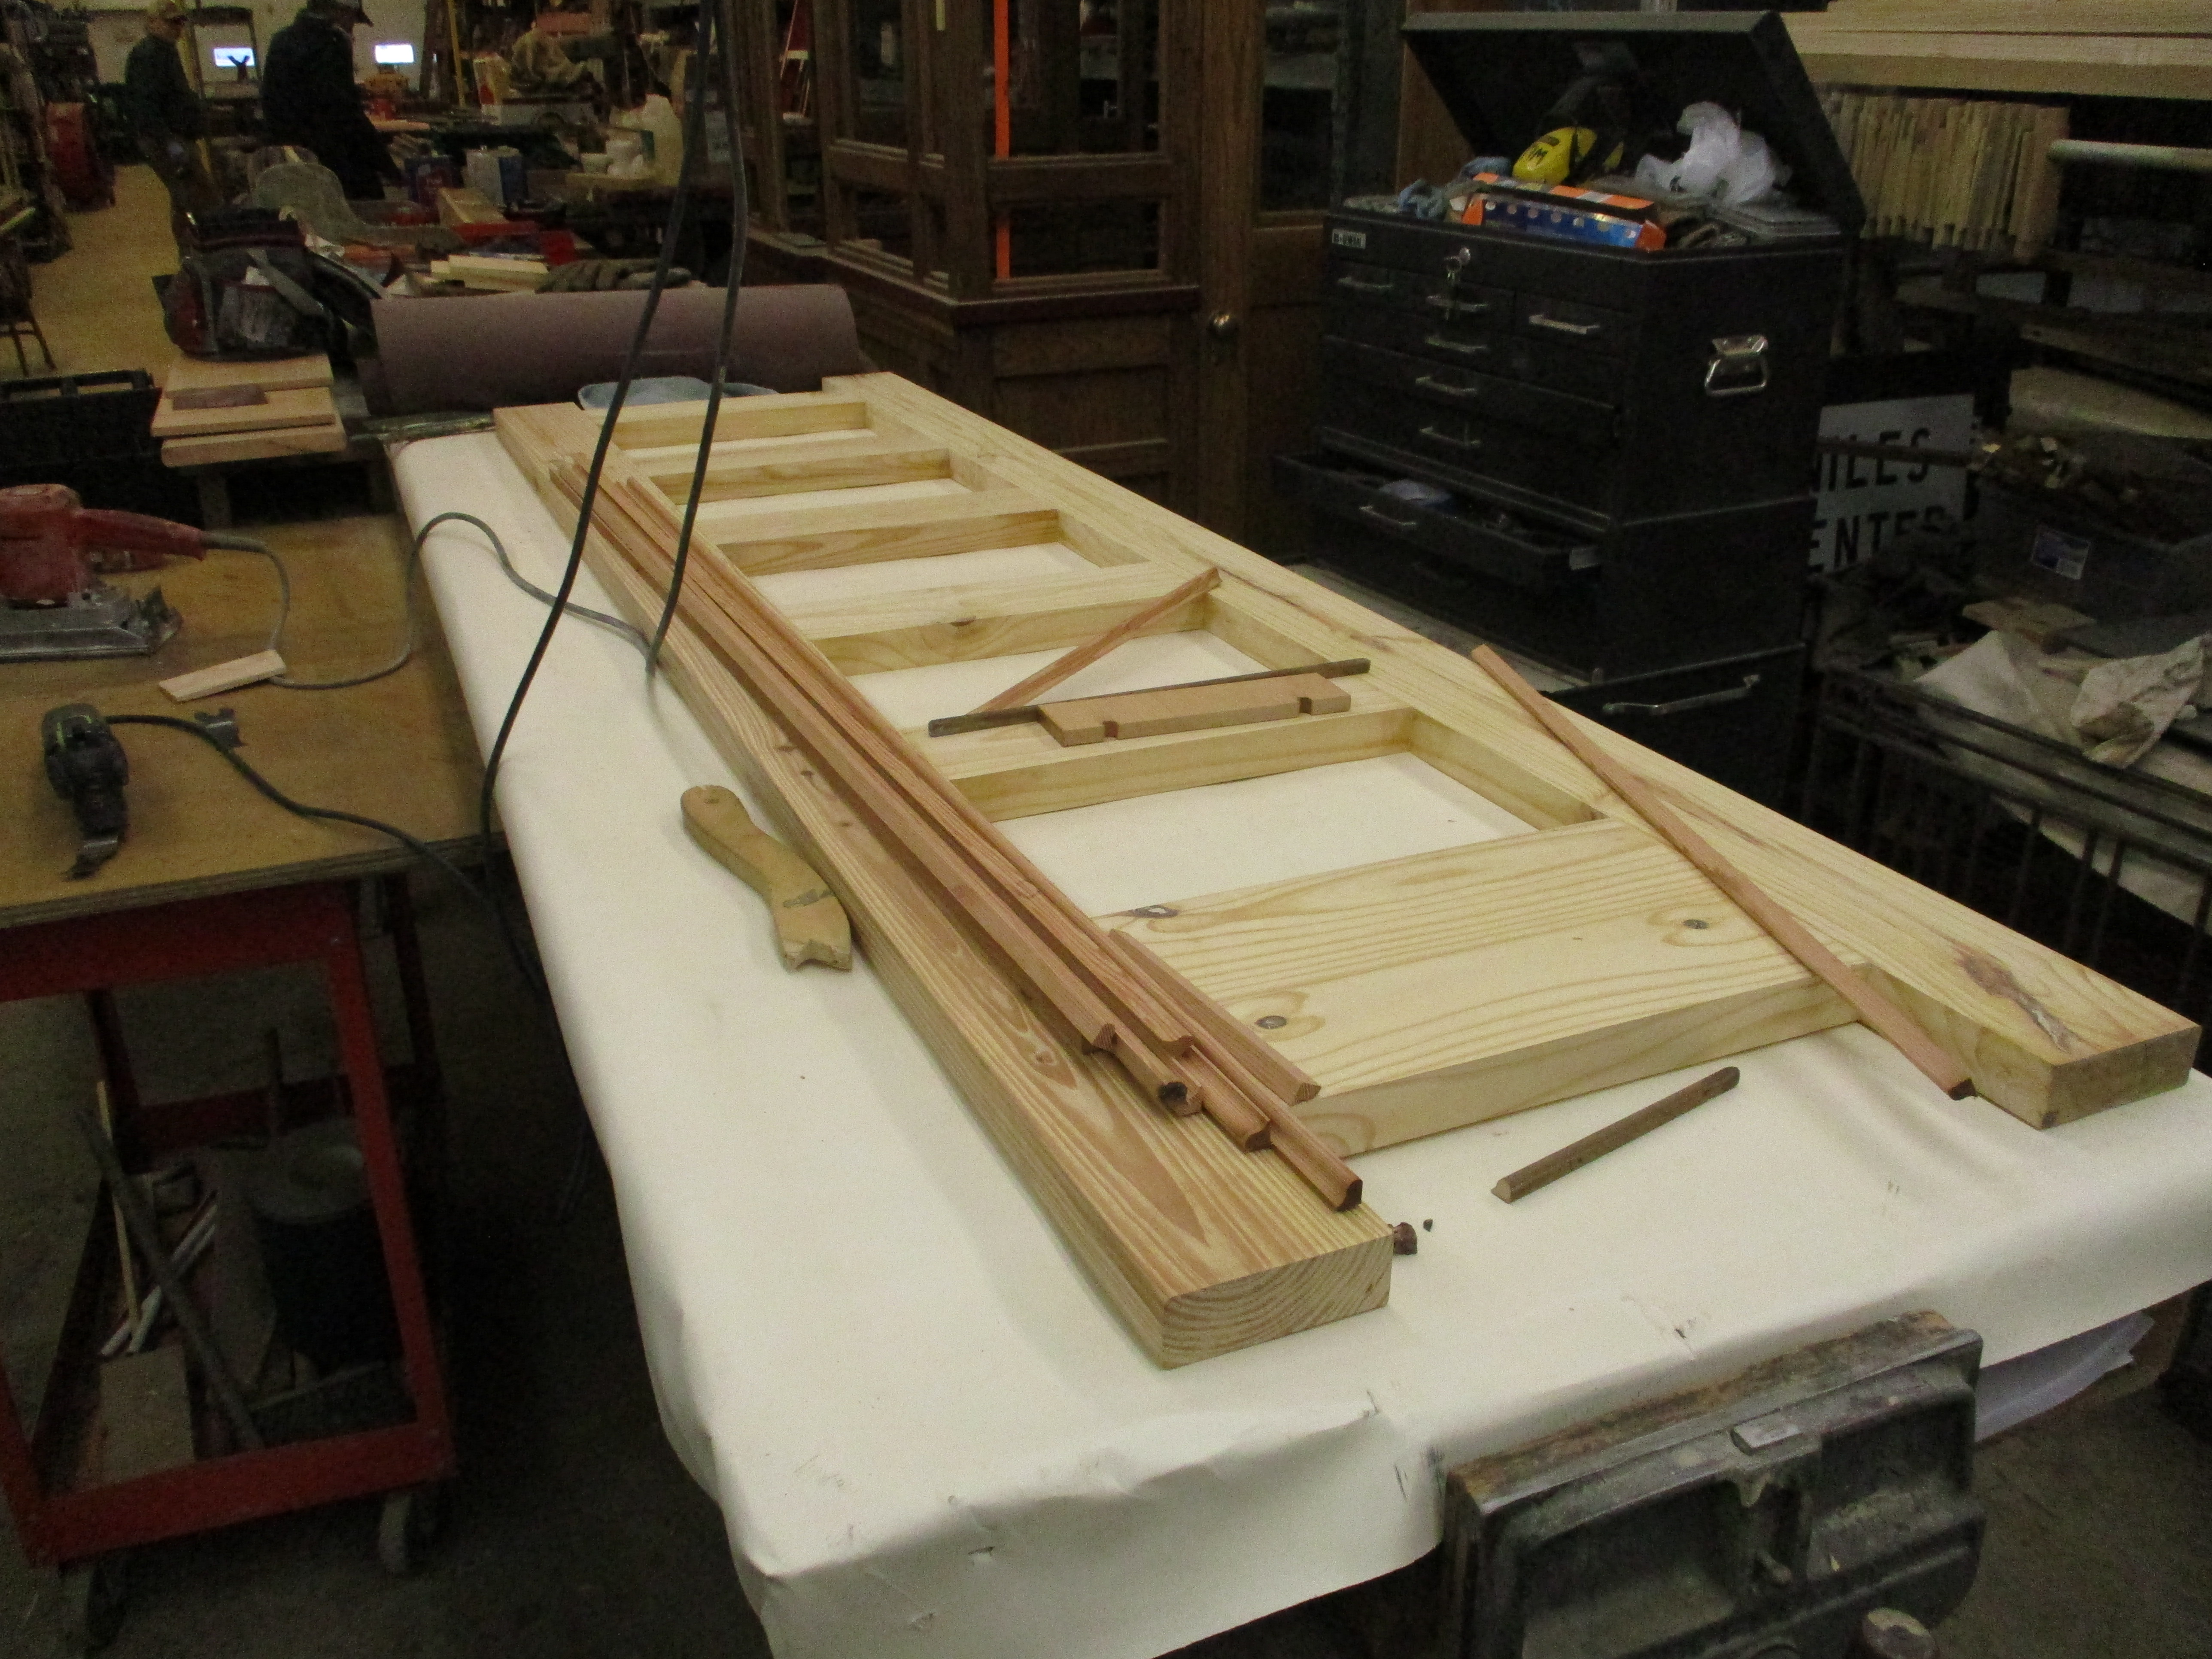
Tim continues to work on his brand-new door for 50th Avenue:


And while we're at it, here's the original ticket booth from Thorndale that he used as a guide:


And Gerry was doing grinding and welding on the 306, as usual, but I didn't get any pictures.  But the structural work is going along very well.

Rich Witt continues to turn out his professional draftings of various parts that are used in many of our restoration projects.  Here's his diagram of the smoke jack for the Pennsy bobber:


And it may not be finished, I'm not sure.  But this is what it's based on:


Meanwhile, I spent the day restringing the various clamps for stretching the canvas on the 453, and adding new ones.  I modified the setup so that all of them can be tensioned from the ground.


In places where I've already installed clamps for stretching side-to-side, it looks pretty good.


We've run out of the wood clamps, although we still have plenty of ratchets and straps.  I can make some more clamps of this sort at home.


At the east end, Tim helped me revise the system so the canvas is being tensioned more horizontally.  That helps pull out any remaining slack in the system.


Now that all of the straps can be tightened from the ground (except for the ones at the east end, which can be reached from the platform of the S-105), anybody can play along at this game.  If you're hanging around Barn 4 with nothing to do, wander around the 453 and check the tightness of the straps.  If one is very loose, that's obviously a problem.  Probably the canvas clamp has come loose.  Otherwise, you can just take up a notch or two to maintain the tension.  Be careful!  It's possible that the canvas clamp could come loose and hit you on the head, so watch out.  You should be able to apply sufficient force to keep up the tension on the canvas without too much effort.

It should not require nearly superhuman strength, such as mine:


Monday, January 25, 2021

Pit work sans pit

Frank writes...

Sunday was another day with more progress on the 18, thanks to the other guys in the shop who were of invaluable help. For most of the day Jack Rzepecki was working with me on the car, mainly on getting the last of the rebuilt brake linkage on the front truck installed. This was not easy work - we ended up having to drop one end of each of the two slack adjusters to free up some of the rigging, and then reinstall both of them afterwards. This meant crawling underneath the truck and trying to find space beneath the motor to swing a small sledge to drive pins out of the rigging. Stuff like this really makes you appreciate having an inspection pit! But the job got done and now the repaired brake rigging is all back together. Thank you Jack!! Thanks also to Nick and Greg, from whom we got an assist to reassemble everything.

But Jack wasn't done yet. In the afternoon and evening, he reinstalled the 18's whistle valve which he repaired. This was the last major air leak on the car (well, there's a bit of a stem leak in the brake valve but that shouldn't be a big issue to fix) so getting the car nice and airtight is a big step forward. Here Jack is shown in the cab of the car, framed both in the 18's window and in the reflection of the end of the 1374.
By the end of the evening everything was put back together and Jack installed a typical WABCO whistle as shown in the above photo, which he sent along. The 18 is now fully prepared for any grade crossings it may come across. A huge thank you to Jack for getting all of this done!
The color here came out awful, but you'll have to take my word for it that the two castings that make up the frame of the first of the 18's rear end marker housings are now the correct Bankers Grey color. The next step for this little project is to acquire some 18-gauge sheet metal (anyone know whether Menards/Home Depot/Lowes carry the stuff?) to build new "tin can" housings for these.

And if that's not enough happening on the 18, I got another update from Bill Wulfert on the car's roll signs:
After removing the cotter pin on the bottom right, I was able to pull that end out, and with a slight tug I was able to get the left gear end out. The sign, or what is left of it is kind of grim. There was almost nothing holding the top and bottom of the sign together, and it tore. The top roller was another story. The long cotter pin came out on the right, but the gear end wouldn't budge. I Kroiled the gear end, and went to the shop for a light hammer. After lots of tugging, it finally came out. Of course the sign roller is bigger than the opening. I had to remove the screw holding the sign light in place, in order to get the sign out of the box.

At the top of the roll is stamped "The Hunter Illuminated Car Sign CO."  "FLUSHING, N. Y."  "NOV 20 1944" "Made in U.S.A." 

MORELAND BLVD

SHAKER BLVD

VAN AKEN BLVD.

TERMINAL

CENTER ROAD

GREEN ROAD

I taped all of the loose pieces together, with a LOT of tape, so that you can view the sign. It will definitely require a new sign. Getting a new sign back into the car will be a challenge. The rollers to the sliding center doors are in view when working on the sign. It is all very compact, and I'm sure the repairmen hated working in that area.

Many thanks to Bill for his work on this! For the moment the side roll sign is on the bench in the wood shop with the other 18 parts but the next time I'm out I will stow it away safely inside the car. I put some more Kroil on the bolts that hold in the frame for this sign, which we will need to remove in order to replace a piece of broken glass. So working on removing that will be on the near-term to-do list.

Of course there was plenty of other stuff happening too. When I arrived, Zach, Greg, and Nick were working over at the Wagner trolley bus loop on removing the strings of Christmas lights from the span wires. Here Zach is in the bucket while the other two are on the ground.
And in other DC Line Department news, Joel showed off this collection of newly overhauled wood strains that were painted on Saturday by Dave Fullarton. The aforementioned trio completed their bucket truck work early in the afternoon and spent much of the rest of the day, together with Richard, working on reinstalling the electrical connections between the four sections of the Electroliner. Getting the 'Liner running again sometime in 2021 is a department priority. Zach also relayed that he had made more progress on the 757 including installing the bulkhead door between the smoker and main compartment. Joel spent much of his day replacing light bulbs and doing other department maintenance work.
And finally, in the evening I took a little while to idly look through some of the Van Dorn drawings that were donated last year by Larry Larson. There's some neat stuff in there, including a lot of fully dimensioned drawings of various coupler and draft gear components manufactured by Van Dorn. And there's this graph showing the results of tests conducted in November 1920 at the Armour Institute, which of course is now IIT. It shows how far apart the coupler heads of Tomlinson and Van Dorn tight-lock couplers spread as an increasing load was placed on them.
Here's a similar graph showing coupler face spread. Two lines are Tomlinsons; two are noted as "Van Dorn #4A / #17 pin / #17 link" which is Van Dorn link-and-pin design; and two are Van Dorn #1450 tight-lock couplers.
And there's this nifty assembly drawing of a tow-bar designed to fit a Van Dorn tight-lock coupler as used by the CSL. This type of coupler is what the trailers like our own 9020 had (the 9020 still has one of its Van Dorn couplers) and Van Dorn supplied special tow-bars that, from the looks of it, were designed to remain rigid with the coupler shank to allow a trailer to be towed by something equipped only with a tow-bar pocket. The note at bottom left also tells us that the CSL used #1450 couplers.

Today's trivia question (and no, I don't know the answer to this): other than the 9020 and a handful of Broad Street and Philadelphia-Delaware Bridge cars, are there any preserved electric cars that still have Van Dorn tight-lock couplers? Once you look closely, they're pretty distinctive, with a pointed "prow" that's cast into the coupler head rather than the Tomlinson design where the "knuckle" is pointed.

Sunday, January 24, 2021

Traction Motor Rewinding

 As long as we're going to be begging for money to pay for traction motor rewinding, we might as well make it educational:

I recently bought a book called "Electric Car Maintenance" at our own IRM Used Book Store.  Say, did we ever mention that the Used Book Store is a great place to shop?  I even saw an article to that effect in Rail and Wire, so you know it must be true.   Anyway...

The book is a compilation of articles from old trade journals.  Here's a very interesting table of useful data for GE traction motors, if you're into technical details.  The GE-66 is the last row in the table on this page.  Some of the columns are pretty obvious, but others require some comment.


First, we see that the maximum axle diameter is given as 5 3/4", but the CA&E cars have 6 1/2" axles.  Maybe that's what puts the "B" in GE-66B motors.  In the first few years, the CA&E was providing much faster service than anybody else, and they had problems with bent axles and broken gears.  The actual gear ratios on the CA&E motors are either 20-32 or 25-40, since they needed bigger, stronger teeth than the table provides for.

The "No. coils in armature" is actually what I would call the number of poles.  There are 39 poles and 39 slots, so five wires per pole gives 195 windings and therefore 195 commutator bars.  The "throw of coils" is important if you're rewinding the armature.  Basically, "1-10" means that each wire leaves a commutator bar through the first slot in one direction or the other; at the other end it then wraps around one fourth of a circle to the tenth slot and back to the commutator.  Notice that the "throw" (in this case 10-1=9) is always equal to the "number of coils" divided by 4, rounded down.  (This will be on the test.)

For some of the motors they give a "safe wearing diameter" of the commutator.  For the GE-67, for instance, they in effect say that you can safely wear down the commutator bars by more than 3/4".  I find that hard to believe, but in any case we're never going to run the cars enough to find out!

Finally, the GE-66 is wound not with wire, but with copper bars 1" x 1/8" that are specially formed and bent.  All of these bars will need to be rewrapped with new insulation.  I would expect that the winding bars should be OK; we know that in one place several of the commutator bars were melted away right down to the axle when the short-out occurred, so they need to be replaced.  That, among other things, is what makes this such an expensive proposition.

Saturday, January 23, 2021

Shaker 18 sign progress

Many thanks to Bill Wulfert, who continues to make progress on the 18's roll signs and sign boxes! He writes with an update of his activities on Thursday:

I decided to go out to IRM, as the weather was supposed to be about 40. I thought I might wire brush and prime the interior of the 18's sign box.  However, I first decided that I would work to get the broken glass out of the bottom of the sign box. There is a metal fold at the bottom of the box, and by using two screwdrivers, I was able to pick out the glass. It all had to be done by feel, as you can't see behind that fold.

I then wire brushed some of the rusty spots. It was very dirty, so I got a vacuum. After wiping down the inside with mineral spirits, I decided that there was some serious rust. So, the next step was some rust converter. It needs to dry for 48 hours, so the priming would have to wait.  Not sure if there will be any days warm enough for priming.  But I masked off the glass and gears, and will prime it when I can.
Then, since I had a light and ladder, I looked at the sign boxes above the center doors.  UGH what a mess. The screws will need to be removed from the outside of the car.  They are however very long, and they stick out on the inside of the box. They could be Kroiled, and perhaps a vice grip might assist in getting them out.  The bottoms of both boxes appear to be flaky rust. Not sure how much steel is left.  Neither sign turns at all.  I'm sure the signs can be extracted, but that may take a while.

Thanks, Bill! I should be out this weekend and will try and take a look at the screws on those side sign boxes. Some Kroil to prep them can't hurt.

Friday, January 22, 2021

Doodlebug Painting

 Gregg Wolfersheim sends us another update on the UP M-35:

Some more progress on the doodlebug in early January with walls in primer:


On the 19th, the buff tan was applied:


The buff tan on the heater partition:

Today the brown was applied to the lower areas:


The men's room partition got the treatment too. The green tape will be removed tomorrow at the dividing line:


Thursday, January 21, 2021

Two For One

Today, friends, you get two exciting features for the low, low price of one -- which is zero, of course.  So first, as a Hicks Car Works exclusive, let's pay a visit to...

THE ELECTROLINER

We were invited to visit the Electroliner today by Steve Sanderson, who has been working on it for quite a while, along with his son Sam and other members of the team.  Because the Liner is located in Barn 7, they need to be pretty independent of the rest of the Car Department, but the Electroliner workers seem to function as a well-oiled machine.

Before we start, though, we must express our deepest sympathy for John Arroyo, who lost his wife recently to cancer.  There's nothing we can say that can help very much, but I hope we will all extend our thoughts and prayers to John in this time of grief.

Steve started by showing me the dining section.  He and Sam have been working to get it ready, and right now the goal is to have the interior ready for public viewing by June.  Of course, that will depend on how the overall virus situation goes.  Anyway, as we have reported before, much of the upholstery work has been done by John McKelvey and Jane Blackburn, and some of the new seats are seen in this photo, while others are stored. 


The whimsical paintings along the upper walls are original and still in excellent condition.  It would be next to impossible to recreate them.


Steve himself has spent a lot of time cleaning up the kitchen/bar area.  When he started it was filthy from neglect over the years, but now it's almost ready for service.


The next car is still being used for storage, but is in good condition.


This is the smoking compartment in the A1 section.


The forward compartment has made great progress.  The ceiling looks great -- we've seen pictures of it before the new panels were installed in years past.


Finally, here's the motorman's compartment again.


So that is quite encouraging.  Our thanks to the entire Electroliner team.   Next up:


BLANK CANVAS

While we're here in Barn 7, let's wander over to the south aisle.  Oh look, somebody brought along a nice cart that might just work for carrying the 453's canvas back to Barn 4.


Well, from here on I don't have many pictures, limited as I am by only having two arms.  But you can imagine how I was able to load the canvas onto the cart while getting the sawhorses out of the way, then out of the barn and over to the shop.  Along the way, I got some help from bystanders in getting the canvas through a narrow door or two.

The 12' x 60' canvas itself weighs 90 lbs when dry, and it was still slightly wet in places, but since you don't have to lift it all at once it can be done.  Over in Barn 4, I then lifted the canvas onto the scaffolds and spread it out on the car.


Those wrinkles have to go.  You look like you slept under a bridge, as my mother would say.

The answer is to start stretching the canvas.  We have a good supply of clamps and ratchet straps to use for just this purpose, so I started on that.  It takes a while, but the stretching process is now in progress.  Here's what one clamp looks like along the side.


And at a corner:


And here's one end of the car.  Of course, there's more to be done, but this is a start.  And it was exhausting, but I needed the exercise.  It will probably be several weeks before I can begin nailing it all down.


Meanwhile, of course, the other guys on the usual crew were hard at work.   Here John is working on his 306 interior parts:


Tim continues to make progress on the 50th Avenue project.  I should have gotten a picture of the new door, but didn't.   It looks great.


Gerry continued to do body and fender work on the 306, and Bill was working on L car parts.  But I  didn't get any pictures -- sorry!

Finally, don't forget the 308!  We'll keep repeating this message until you come up with the money!

Wednesday, January 20, 2021

Chipping Away

 Here's a report from Tuesday, and as always we have several different projects to chip away at.

To start with, I went over to Barn 7 to check on the canvas which had been left there on Sunday.  It's draped over several sawhorses, stretching down the aisle.  Most of it was still frozen and stiff, so I left it in place.  We'll check again on Thursday.


Next, I went to look at the 453.  Andy had continued to do some needle-chipping when I left, so here's where he got to.


I spent most of the rest of the day alternating between needle-chipping and wire-wheeling on the letterboard.  The letters have not yet been traced, so we're leaving them alone for now.

But I wasn't the only one.  Frank Kehoe was there, working on the motor truck for the 1754.  He had a lot of needle-chipping to do also, so some of the time we were both using the shop air as fast as we could.  Luckily there was enough for both of us.


There's a lot to do.


And John was working on interior parts for the 306.


While Gerry was grinding away:


and/or torching off parts of the structure that need to be replaced.


I also took a break to put primer on the newly-rebuilt window frame for the 18.


Tim continues to work on building a new door for 50th Avenue.  This:


will replace this.


Meanwhile, I'm still up on the scaffold.  For a little variety, let's see how well the wire-wheel works on the flaking paint inside the car.   Before:


and after a couple of minutes of work:


It actually looks somewhat better than this in person, due to the lighting.  In any case, it should not be too difficult to remove the flaking paint from most of the inside surfaces.  So if anyone would like to be put in charge of the Department of the Interior, submit your resume, character references, and large amounts of unmarked cash to Box 453 in the office, and the winner will be notified as soon as we make a decision.


By the end of the day, I had managed to get this far with both needle-chipping and wire-wheeling.   I can only wish there were an easier way to do this.  But it is what it is.